I want to move from A to B to C to D with some holds. I have tried using the camera tool, which should be the obvious and simple way, but it's clumsy. You can't add the moves in sequence and it's not very intuitive to use with the fiddly handles and the end result drifts inexplicably off course as it progresses from one position to the next. I really don't understand why it is not working as I expect it to and I dearly wish there was a simple and accurate camera move tool which allowed me to move from various points, adding the keyframe positions as I go, but it doesn't do that. This seems like a really good thing to improve and I had hoped version 11 would have some improvement, but it's just the same as it was in v.10
The Keyframer is the more accurate mode, but the online instructions are really vague and unspecific. At least I can't find a clear tutorial for making a camera move. I am hoping someone can point to clear and simple instructions.
By the way, I have done a multiplane move, so I understand the way it's supposed to work, but for keyframing, it just isn't working for me. I have five layers and I want the camera to move on all the layers at the same time, just as if it was a pile of real layers in the old fashioned way. That is, the source should be all the layers, but I can't make it do that. When I keyframe the move out, I cannot see any real time preview, only faint yellow boxes moving, but they are near impossible to see against the white BG image. I want to check the move without having to render the whole thing, just like the camera tool does, but I'm not able to get that. I don't understand the tab "Apply on Current Layer". No matter how I set that, I get no result. I set the keyframes, render and the result has no move. I could go on and on about what I am doing that doesn't work, but I am unable to achieve any camera move. Does anyone have any clear guide that would help me? Thank you!!
A simple camera move. How??
-
David_Fine

- Posts: 557
- Joined: 29 Aug 2014, 16:39
A simple camera move. How??
David Fine
iMac late 2014 3.5 GHz, 32GB RAM
Snowden Fine Animation Inc.
Vancouver, Canada
iMac late 2014 3.5 GHz, 32GB RAM
Snowden Fine Animation Inc.
Vancouver, Canada
-
Peter Wassink

- Posts: 4291
- Joined: 17 Feb 2006, 15:38
- Location: Amsterdam
- Contact:
Re: A simple camera move. How??
You touched a problematic issue.
There are three methods of doing camera moves in tvpaint but unfortunately none of them are ideal.
-the camera tool, is unintuitive but once you understand how it works its a quick and easy way to do simple moves.
emphasis on simple because it gets hard to control when you want something extra like holds or more then three positions.
as you experienced the curve lacks control resulting in drifts where you need holds.
It cannot do multiplane shots.
Its main advantage is that its non-destructive.
- the keyframer, offers the most control, its problem: in most cases you need a separate project as a source.
making the process more complex.
And it still has its problems with control. although you can make splines to control the path, these splines also influence the spacing, which is undesirable.
you can use the progres profile to counter this but it works only globally so you cannot control the dynamic of the separate axis, and the profile also lacks spline controls.
You can use it to create multiplane shots, but you cannot preview these nor render them in one go. you have to do it layer per layer.
- Multiplane camera, is a relatively easy method to create multiplane shots but camera control is very very hard.
its not possible to create a camera path. so if you need more control over the camera its better to use the keyframer.
Peter Wassink - 2D animator
• PC: Win11/64 Pro - AMD Ryzen 9 5900X 12-Core - 64Gb RAM
• laptop: Win10/64 Pro - i7-4600@2.1 GHz - 16Gb RAM
• PC: Win11/64 Pro - AMD Ryzen 9 5900X 12-Core - 64Gb RAM
• laptop: Win10/64 Pro - i7-4600@2.1 GHz - 16Gb RAM
Re: A simple camera move. How??
my couple of work-arounds :
1) the Camera tool route : for a A>B>C>D move with some holds on B and C,
- I split the Clip in 3 clips, A>B, B>C, C>D,
then, you will have to set 3 simple (2 pts) moves,
- set Frame A and Frame B into the first clip,
- go to next clip, "RMB/copy last point of previous clip" to copy frame B into the second clip, set Frame C,
- go to next clip, "RMB/copy last point of previous clip" to copy frame C into the third clip, set Frame D,
this method is ok when the timing is validated and definitive, othewise it could be a problem,
because the camera speed will change with the timing change.
to preview the whole thing, in the timeline panel (project view),
go to the 1rst frame of the 1rst clip, enable Mark IN,
go to the last frame of the 3rd clip, enable Mark Out, then "Play".
2) the KeyFramer route now ( 2 step) :
A) pre-merge a temporary "working" anim-layer, and set the KF moving on it,
B) then Apply this KF of the FX-Stack on the original group of layers.
here's the process in details:
- select the group of (target) layers, duplicate selected layers, merge selected layers,
(so you will get a pre-merged version of your group of layers),
- hide the original (target) group, and go with the pre-merged animlayer,
- set your Keyframer (show current Layer only), prewiew, when satisfied, apply,
and check the camera move after applied (real time), if validated, Delete this (temp) working-layer,
- enable (show ON) and Select the original (target) group of layers, Apply the KF_FX on the Group.
it's not as easy as it should be, but for the time being, it does work for me.
-
David_Fine
- Posts: 557
- Joined: 29 Aug 2014, 16:39
Re: A simple camera move. How??
Firstly, to Peter's message. It disappoints me that in TVPaint V 11, something as basic and important as camera moves is not refined and easy to use. That actually shocks me. I was Youtubing how it's done in Harmony and it seems much easier, although I have not tried it there. I wonder, is this issue unique to TVPaint or is does Harmony have the same kind of issues? That is, if they have it worked out, why not TVPaint?
I was going to ask, in any case, how I am supposed to be doing the camera move, and then ZigOtto posted instructions! Thank you Zig. I will have a go. I will say, the Camera tool should be the most intuitive and easiest way to do this and it baffles me that it isn't. Splitting into separate clips seems a crazy amount of hassle. Why oh why does this tool not just work??? TVPaint developers, please insert answer here: __________
The tips on using Keyframer are very helpful. Again, all this premerging seems a crazy step to have to do, but at least it makes sense. I will try this and report back about how it goes. Thank you.
David Fine
iMac late 2014 3.5 GHz, 32GB RAM
Snowden Fine Animation Inc.
Vancouver, Canada
iMac late 2014 3.5 GHz, 32GB RAM
Snowden Fine Animation Inc.
Vancouver, Canada
-
David_Fine
- Posts: 557
- Joined: 29 Aug 2014, 16:39
Re: A simple camera move. How??
Okay, so just back from following the Zig instructions using Keyframer. It worked great! So the trick is that you can't really do a keyframe camera move on layers. You have to merge them all and then do the move on that one single layer. That is the vital thing. I'm not sure about the the last instruction about deleting the merged layer and then applying them to the layers. Why do that if it works on the merged version? Also, I do get preview playback of the move on the single layer, but it is very stuttery and jerky, so really only a rough indication. I do have a very fast Mac too. The playback when using the Camera tool is much better. Why is the preview playback in keyframer so terrible?
David Fine
iMac late 2014 3.5 GHz, 32GB RAM
Snowden Fine Animation Inc.
Vancouver, Canada
iMac late 2014 3.5 GHz, 32GB RAM
Snowden Fine Animation Inc.
Vancouver, Canada
-
D.T. Nethery

- Posts: 4134
- Joined: 27 Sep 2006, 19:19
Re: A simple camera move. How??
I agree on all the points raised by you and Peter. The Camera Tool needs more precise controls . Also agree that Zig's tips on using the KeyFramer are a good solution .David_Fine wrote:Firstly, to Peter's message. It disappoints me that in TVPaint V 11, something as basic and important as camera moves is not refined and easy to use. That actually shocks me. I was Youtubing how it's done in Harmony and it seems much easier, although I have not tried it there. I wonder, is this issue unique to TVPaint or is does Harmony have the same kind of issues? That is, if they have it worked out, why not TVPaint?
I was going to ask, in any case, how I am supposed to be doing the camera move, and then ZigOtto posted instructions! Thank you Zig. I will have a go. I will say, the Camera tool should be the most intuitive and easiest way to do this and it baffles me that it isn't. Splitting into separate clips seems a crazy amount of hassle. Why oh why does this tool not just work??? TVPaint developers, please insert answer here: __________
The tips on using Keyframer are very helpful. Again, all this premerging seems a crazy step to have to do, but at least it makes sense. I will try this and report back about how it goes. Thank you.
However, I will say this for the Camera Tool: if you can get a feel for using it , it is possible to do a simple Camera move from Point A to Point B , then Point B to Point C , then Point C to Point D (with holds at each point if desired) within a single clip .
See screen capture below. The flat line sections are the holds.
(click on the image to see it larger)
Still needs improvement. (and even with the current version there are no precise instructions in the user manual on how to add a HOLD in the middle of a camera move by flat-lining the time profile) .
------
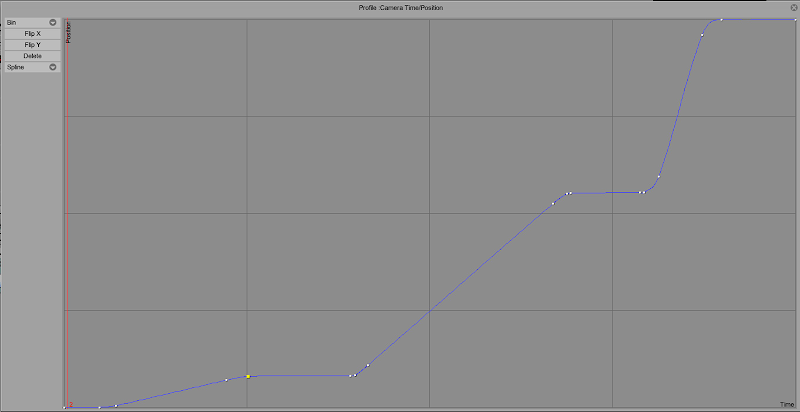
Switching the Camera Time Profile to SPLINE mode can make the starts and stops (slow-outs/slow-ins) a bit smoother . I'm not sure if that difference is apparent in the embedded .gif files here because .gifs can tend to play back at odd frame rates depending on the browser and the user's bandwidth , so it may look choppier than the original, but to me the same camera moves in SPLINE mode seem smoother than in in Linear mode.

.
Animator, TVPaint Beta-Tester, Animation Educator and Consultant.
MacOS 12.7.1 Monterey , Mac Mini (2018) , 3.2 GHz 6-Core Intel Core i7,
16 GB RAM , TVPaint PRO 11.7.1 - 64bit , Wacom Cintiq 21UX 2nd Gen.
,Wacom Intuos Pro 5 , Wacom driver version 6.3.39-1
Re: A simple camera move. How??
because in some circonstances, you need to keep your animation un-merged, (f.i. when you foresee to apply some FX such as a color-correction, a texture, a shadow or whatever) on one layer but not on all the others.David_Fine wrote:... I'm not sure about the the last instruction about deleting the merged layer and then applying them to the layers. Why do that if it works on the merged version?
so I describe the way to get a KF-preview on the pre-merged anim, but just as a (virtual) preview, then to apply it on the group of layers to keep the anim layered as it was initially in the project.
of course, if you don't need to keep your initial layers structure, apply the KF on the merged version and keep it.
yep, holds are possible in a camera path, but the thing is it's not so easy to get a perfect FLAT sectionD.T. Nethery wrote:... same move , but in Spline mode ...
in the speed profile in Spline mode (unfortunatly, we haven't beziers spline to adjust the handles),
also, we have no way to easily link a camera point to a specific frame/instance in the timeline,
imo, the camera path setting is definitively something to improve in one of the next coming versions.
-
David_Fine
- Posts: 557
- Joined: 29 Aug 2014, 16:39
Re: A simple camera move. How??
My experience doing a simple camera move has been good when going basically from A to B. I like the way I can control the curve and it seems to work good, but when I need to go from A to B to C to D, it's horrible. No matter how hard I try to keep it flat, it weaves in an unexpected way. It's also really hard to add camera positions. I can't design A to B and then add C and D because it won't let me add camera positions after the last one, only in between. So I have to change B to D and then add B back in and then C. It's fine if you know first of all what you are doing, but still cumbersome. In any case, the weaving around makes the move useless for final work, which is frustrating. I am also confused about how the move map works as regards the flat line. At what vertical height is each camera move? That is, how am I supposed to know at what vertical position represents the next camera position so to go flat? It's really not clear how this works in that regard and then keeping it flat is really eyeballing and in my experience, is hit and miss. Maybe there are hidden tricks like keyboard shortcuts to keep things accurately horizontal, but I don't know about them.
I can see why keeping the material unmerged is good, but ultimately, once all effects and things have been applied, one can then merge and do the move on that merged layer.
On a separate subject, in the Keyframer, having designed a move successfully, how do I control the ease in and out curve the way I want? That's not immediately clear.
David Fine
iMac late 2014 3.5 GHz, 32GB RAM
Snowden Fine Animation Inc.
Vancouver, Canada
iMac late 2014 3.5 GHz, 32GB RAM
Snowden Fine Animation Inc.
Vancouver, Canada
-
Paul Fierlinger

- Posts: 8100
- Joined: 03 May 2008, 12:05
- Location: Pennsylvania USA
- Contact:
Re: A simple camera move. How??
David, I too agree with everyone here when they say it 's not easy but once you learn the quirks it's not hard either. A good trick is to not just stretch the Profile window across the entire length of the clip, but also drag the bottom edge downwards to make the graph fat. Then use the Smart Spline setting and at each point place two keys close to each other. These two tips will make it easier to create a flat line because when the curve window is fat, you can observe with ease every increment where the blue line steps out of its horizontal.
As to your question how should you know where the horizontal line starts running flat, pay attention to the red vertical line representing your cursor's place on the layer. Also you have the exact frame number corresponding to that place in time showing at the bottom edge of the graph window.
EDIT: By the way, this is why I like multiple monitors, because you can stretch out the layer panel to a comfortable length and get a better close up view of every key. I can see how this might be much harder for you since you keep your layer panel on a single monitor (which I do as well, but have the capability to drag it across three monitors when working out a camera move such as yours.
EDIT, EDIT: I forgot to mention that once you have the two keys that are close to each other working the way you want them to go, as the last thing bring each pair together so that they become one. This way you will not get any wobbles.
Paul
http://www.slocumfilm.com
Desktop PC Win10-Pro -64 bit OS; 32.0 GB RAM
Processor: i7-2600 CPU@3.40GHz
AMD FirePro V7900; Intuos4 Wacom tablet
http://www.slocumfilm.com
Desktop PC Win10-Pro -64 bit OS; 32.0 GB RAM
Processor: i7-2600 CPU@3.40GHz
AMD FirePro V7900; Intuos4 Wacom tablet
-
D.T. Nethery
- Posts: 4134
- Joined: 27 Sep 2006, 19:19
Re: A simple camera move. How??
Paul Fierlinger wrote: Use the Smart Spline setting and at each point place two keys close to each other. These two tips will make it easier to create a flat line because when the curve window is fat, you can observe with ease every increment where the blue line steps out of its horizontal.
As to your question how should you know where the horizontal line starts running flat, pay attention to the red vertical line representing your cursor's place on the layer. Also you have the exact frame number corresponding to that place in time showing at the bottom edge of the graph window.
EDIT, EDIT: I forgot to mention that once you have the two keys that are close to each other working the way you want them to go, as the last thing bring each pair together so that they become one. This way you will not get any wobbles.
Paul highlights something very important that I should have mentioned in my earlier example : note that when I flat line the time profile (to make a hold) I am inserting an extra point (or "key" or "tip" as Paul says) very close to the point that designates the end of the hold. This helps to make it a motionless hold (no "drifting" or "wobbles") . This way I can get my camera move from Position A to Position B -- hold -- Position B to Position C -- hold -- Position C to Position D -- hold -- .
Also note that I created Position C (the hold on the cactus) not with a new point on the camera path , but by making a new point (key) on the Camera Time Profile and holding it (flat-lining it) , before proceeding to the end position D .
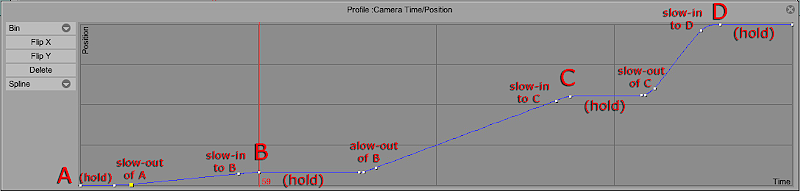
(Notice on the held positions B and C the second point that is positioned very close to the previous point which is the end of the hold. I didn't need the second point after the brief hold on Pos. A at the start , because that point is actually the slow-out from A . And at the end on Pos. D I don't need the second point because the camera isn't going to move again after it flat-lines at Pos. D )
And Paul is correct , if you expand the Camera Time Profile (on a separate monitor, if you have one) it's easier to manage .These two tips will make it easier to create a flat line because when the curve window is fat, you can observe with ease every increment where the blue line steps out of its horizontal. By the way, this is why I like multiple monitors, because you can stretch out the layer panel to a comfortable length and get a better close up view of every key. I can see how this might be much harder for you since you keep your layer panel on a single monitor (which I do as well, but have the capability to drag it across three monitors when working out a camera move such as yours.
----------
EDIT:
In reference to this post about setting the positions on the Camera time profile , I had someone contact me by private message , saying: "When I set camera start and end positions it shows the camera move, but when I export it to video it is just the same picture, as if I didn't add any camera move to it." . The solution was easy , but it is something that I think is sometimes a bit confusing for other new users , therefore I am reposting the answer I sent , so that anyone else who is searching the forum in the future about how to use the Camera Tool will see this --
IMPORTANT: when you Export to a .mov or .avi you must set the View to Camera (instead of Project view) in the Export window, so the camera move will be rendered on your exported movie.
OR before you export you should go to the Project menu > Render Camera to new Project or Render Camera to new merged Project (if you want all layers merged) , then export to a .mov or .avi .


.
.
Last edited by D.T. Nethery on 07 Aug 2015, 14:40, edited 1 time in total.
Animator, TVPaint Beta-Tester, Animation Educator and Consultant.
MacOS 12.7.1 Monterey , Mac Mini (2018) , 3.2 GHz 6-Core Intel Core i7,
16 GB RAM , TVPaint PRO 11.7.1 - 64bit , Wacom Cintiq 21UX 2nd Gen.
,Wacom Intuos Pro 5 , Wacom driver version 6.3.39-1
Re: A simple camera move. How??
in the KeyFramer_FX, you have to enable the Progress Profile (see pict.),David_Fine wrote:...
On a separate subject, in the Keyframer, having designed a move successfully, how do I control the ease in and out curve the way I want? That's not immediately clear.
- progressprofile.png (8.36 KiB) Viewed 42967 times
(by default, the speed-curve is flat, an upward straight diagonal).
it's a "global" profile, from start to end of the KF effect,
so, when you have only two keys, setting a speed curve it's easy as pie,
but when you have more than 2 keys, the inbetween keys position on the timeline
will sort of "float" away (forward/backward) regarding the curvature of the profile.
warning : don't try to edit any KF key position when a custom progess profile is set on,
disable the progess-profile first, edit the key(s), then enable it again,
otherwise, it's a pain in the ass when trying to clic on and move a point,
(you'll inevitably generate unwanted new extra key(s) ...)
-
Peter Wassink
- Posts: 4291
- Joined: 17 Feb 2006, 15:38
- Location: Amsterdam
- Contact:
Re: A simple camera move. How??
yes this is a long standing issue, very annoying, even if you are aware of it.ZigOtto wrote: warning : don't try to edit any KF key position when a custom progess profile is set on,
disable the progess-profile first, edit the key(s), then enable it again,
otherwise, it's a pain in the ass when trying to clic on and move a point,
(you'll inevitably generate unwanted new extra key(s) ...)
Peter Wassink - 2D animator
• PC: Win11/64 Pro - AMD Ryzen 9 5900X 12-Core - 64Gb RAM
• laptop: Win10/64 Pro - i7-4600@2.1 GHz - 16Gb RAM
• PC: Win11/64 Pro - AMD Ryzen 9 5900X 12-Core - 64Gb RAM
• laptop: Win10/64 Pro - i7-4600@2.1 GHz - 16Gb RAM
-
D.T. Nethery
- Posts: 4134
- Joined: 27 Sep 2006, 19:19
Re: A simple camera move. How??
After working on a recent project I have come to the conclusion that the workaround method ZigOtto outlines above gives the most control and is easier to manage in the end , as long as you can get used to the idea that to do a series of 3 or 4 simple camera moves -- From A to B -- B to C -- C to D -- D to E -- you will have to split your Scene into 3 or 4 clips to apply the camera moves from point to point , then merge the clips in the end make it a single scene again. For me this has turned out to be a much faster process than trying to control the camera moving and holding within a single scene by flat-lining the points on the Time Profile . ( It can be done , but it requires a lot of fine-tuning of the points , so it is more effort. )ZigOtto wrote:
1) the Camera tool route : for a A>B>C>D move with some holds on B and C,
- I split the Clip in 3 clips, A>B, B>C, C>D,
then, you will have to set 3 simple (2 pts) moves,
- set Frame A and Frame B into the first clip,
- go to next clip, "RMB/copy last point of previous clip" to copy frame B into the second clip, set Frame C,
- go to next clip, "RMB/copy last point of previous clip" to copy frame C into the third clip, set Frame D,
this method is ok when the timing is validated and definitive, otherwise it could be a problem,because the camera speed will change with the timing change.
to preview the whole thing, in the timeline panel (project view),
go to the 1rst frame of the 1rst clip, enable Mark IN,
go to the last frame of the 3rd clip, enable Mark Out, then "Play".
It's an awkward workaround , but it does WORK. The thing that bothers me is : how does the new user ever learn about this ? They won't get it from the User Manual as it is currently presented. (for example , it's not obvious from the User Manual that you can do what Zig suggests: RMB/"Copy last point from previous clip" to transfer the point from clip to clip ... how does anyone find out about this other than by regularly reading the forum and getting lucky to stumble upon a thread like this one ? Most users don't spend time participating in this forum, so the procedure has got to be covered in precise, step-by-step detail in the User Manual .
Animator, TVPaint Beta-Tester, Animation Educator and Consultant.
MacOS 12.7.1 Monterey , Mac Mini (2018) , 3.2 GHz 6-Core Intel Core i7,
16 GB RAM , TVPaint PRO 11.7.1 - 64bit , Wacom Cintiq 21UX 2nd Gen.
,Wacom Intuos Pro 5 , Wacom driver version 6.3.39-1
-
David_Fine
- Posts: 557
- Joined: 29 Aug 2014, 16:39
Re: A simple camera move. How??
You are very right about that and this is perhaps one my biggest issues with TVPaint. The manual is lacking and outdated and vital information about how to use the program effectively needs to be garnered from places like this, which is very hard for the new user. How can a professional program be sold without it providing these very important and basic details about how to use it? I know, the team is small and we have this great forum, but really, it does shock me that there is this much discussion on the forum from seasoned users just to figure out how to do a camera move. This is very basic functionality and should just work.
As regards using the camera tool, I am still confused about how to know when to flat line in terms of the vertical position. I know you use the timeline to see where the red line is horizontally, but that does not tell you how high to raise the line to flat line when you want to hold. It seems entirely arbitrary.
As regards using the camera tool, I am still confused about how to know when to flat line in terms of the vertical position. I know you use the timeline to see where the red line is horizontally, but that does not tell you how high to raise the line to flat line when you want to hold. It seems entirely arbitrary.
- Pasted_Image_06-Jun-2015__11_23_AM.png (65.45 KiB) Viewed 42930 times
David Fine
iMac late 2014 3.5 GHz, 32GB RAM
Snowden Fine Animation Inc.
Vancouver, Canada
iMac late 2014 3.5 GHz, 32GB RAM
Snowden Fine Animation Inc.
Vancouver, Canada
-
Paul Fierlinger
- Posts: 8100
- Joined: 03 May 2008, 12:05
- Location: Pennsylvania USA
- Contact:
Re: A simple camera move. How??
David, it just occurred to me; do you have your view finder activated when you plot your camera move? I ask because if you did, you would see where your camera's position (view) is in time and space. The difference between your left arrow's position and the right one would show as two different zoom-end positions and that gives you the height along the graph.
In the same way, to decide whether the speed curve should be closer to the left or right means a change in the speed of the zoom.
The over all length of the clip tells you how long the holds should be. The longer the length of the clip, the more time you have for the camera moves.
All these positions come through when you start of by using your view finder and set your graph first to linear -- everything else on the graph falls into place. Then change linear to spline and add a second key close to each first one from which point you can tweak the slow ins and outs.
Paul
http://www.slocumfilm.com
Desktop PC Win10-Pro -64 bit OS; 32.0 GB RAM
Processor: i7-2600 CPU@3.40GHz
AMD FirePro V7900; Intuos4 Wacom tablet
http://www.slocumfilm.com
Desktop PC Win10-Pro -64 bit OS; 32.0 GB RAM
Processor: i7-2600 CPU@3.40GHz
AMD FirePro V7900; Intuos4 Wacom tablet